1.下载
httpz需要你的Go版本为1.22+。我们先创建并初始化一个名为helloworld的Go项目:
mkdir helloworld && cd helloworld
go mod init helloworld
下载 httpz:
go get github.com/aeilang/httpz@latest在当前目录创建main.go文件:
package main

import (
	"log"
	"net/http"

	"github.com/aeilang/httpz"
)

func main() {
	mux := httpz.NewServeMux()

	mux.Get("/hello", helloHandler)

	log.Fatal(http.ListenAndServe(":8080", mux))
}

func helloHandler(w http.ResponseWriter, r *http.Request) error {
		w.Write([]byte("hello httpz"))
		return nil
}
运行服务:
go run main.go访问 http://localhost:8080/hello
,你将会在浏览器上看到hello httpz
2.返回错误
你可以看到,helloHandler返回error:
func helloHandler(w http.ResponseWriter, r *http.Request) error {
	w.Write([]byte("hello httpz"))
	return nil
}
考虑下面的例子:
// ...

// mux.Get("hello", helloHandler)
func helloHandler(w http.ResponseWriter, r *http.Request) error {
    // 获取请求参数name
	name := r.URL.Query().Get("name")

	if name == "" {
		return httpz.NewHTTPError(http.StatusBadRequest, "name is required")
	}

	fmt.Fprintf(w, "hello %s\n", name)
	return nil
}访问http://localhost:8080/hello
, 这时name为空字符串,你将会看到:{"msg":"name is required"},这是我们默认的错误处理函数返回的响应。
访问http://localhost:8080/hello?name=lihua,这时name=lihua,
你将会看到: hello lihua。
3.路由
除了GET,你还可以使用其他请求方法,例如,POST, PUT, PATCH, DELETE等
mux.Post("/books", createBook)
mux.Get("/books", getBooks)
mux.Put("/books/{id}", updateBook)
mux.Delete("/books/{id}", deleteBook)
4.数据绑定
路径参数
- 使用net/http的
r.PathValue函数获取:
package main

import (
	"log"
	"net/http"

	"github.com/aeilang/httpz"
)

func main() {
	mux := httpz.NewServeMux()

	mux.Get("/books/{id}", getBook)

	log.Fatal(http.ListenAndServe(":8080", mux))
}

func getBook(w http.ResponseWriter, r *http.Request) error {
	id := r.PathValue("id")
	w.Write([]byte(id))
	return nil
}访问http://localhost:8080/books/1
你将会看到1。
- 使用
httpz.BindPathParams函数
// ...

type Book struct {
	ID int `param:"id"` // 知道路径参数名为id
}

func getBook(w http.ResponseWriter, r *http.Request) error {
	var b Book
	if err := httpz.BindPathParams(r, &b); err != nil {
		return err
	}

	fmt.Fprintf(w, "%d", b.ID)
	return nil
}
结果是一样的。这种方法能自动反序列化为对应的类型。当路径参数有多个,或需要我们手动转化类型时很有用,例如:
mux.Get("/books/{id}/{author_id}", getBook)。
请求参数
- 使用
httpz.BindQueryParams函数
// ...

type User struct {
	Name string `query:"name"` // 使用query标签绑定请求参数
	Age  int    `query:"age"`
}

// mux.Get("/user", getUser)
func getUser(w http.ResponseWriter, r *http.Request) error {
	var u User
	if err := httpz.BindQueryParams(r, &u); err != nil {
		return err
	}

	return json.NewEncoder(w).Encode(u)
}访问http://localhost:8080/user?name=lihua&age=18
你将会看到{"Name":"lihua","Age":18}。
- 使用net/http,
r.URL.Query函数.
// ...

// mux.Get("/user", getUser)
func getUser(w http.ResponseWriter, r *http.Request) error {
	vals := r.URL.Query()
	name := vals.Get("name")
	age  := vals.Get("age")

	ageInt, err := strconv.Atoi(age)
	if err != nil {
		return httpz.NewHTTPError(http.StatusBadRequest, "age must be int")
	}

	u := User{
		Name: name,
		Age:  ageInt,
	}

	return json.NewEncoder(w).Encode(u)
}
结果是一样的。
表单参数
application/x-www-form-urlencoded
- 使用 httpz.BindBody函数
type User struct {
	Name string `form:"name"` // 使用form标签绑定表单参数
	Age  int    `form:"age"`
}

// mux.Post("/user", createUser)
func createUser(w http.ResponseWriter, r *http.Request) error {
	var u User
	if err := httpz.BindBody(r, &u); err != nil {
		return err
	}

	return json.NewEncoder(w).Encode(u)
}
在命令行输入下列POST请求:
curl -d "name=lihua" -d "age=18" http://localhost:8080/user打印:
{"Name":"lihua","Age":18}- 使用net/http, r.FormValue函数
// mux.Post("/user", createUser)
func createUser(w http.ResponseWriter, r *http.Request) error {
	name := r.FormValue("name")
	age := r.FormValue("age")
	ageInt, err := strconv.Atoi(age)
	if err != nil {
		return httpz.NewHTTPError(http.StatusBadRequest, "age must be int")
	}

	u := User{
		Name: name,
		Age:  ageInt,
	}

	return json.NewEncoder(w).Encode(u)
}
结果是一样的。
Form multipart/form-data
绑定文件直接使用net/http, r.FormFile函数
// mux.Post("/file", saveFile)
func saveFile(w http.ResponseWriter, r *http.Request) error {
	// 限制最大上传文件大小(可选)
	r.ParseMultipartForm(10 << 20) // 10 MB

	// 获取上传的文件
	file, header, err := r.FormFile("file")
	if err != nil {
		return httpz.NewHTTPError(http.StatusBadRequest, "failed to get file")
	}
	defer file.Close()

	// ... save file

	return nil
}
json数据
- 使用httpz.BindBody函数,底层使用json标准库来反序列化。
type User struct {
	Name string `json:"name"` // 使用json标签绑定json数据,标准库语法
	Age  int    `json:"age"`
}

// mux.Post("/user", createUser)
func createUser(w http.ResponseWriter, r *http.Request) error {
	var u User
	if err := httpz.BindBody(r, &u); err != nil {
		return err
	}

	return json.NewEncoder(w).Encode(u)
}
命令行输入下列POST请求:
curl -X POST -H "Content-Type: application/json" -d '{"name": "lihua", "age": 18}' http://localhost:8080/userxml数据也是如此
httpz.Bind 函数
可以指定多个参数来源:
type User struct {
	Name string `param:"name" query:"name" form:"name" xml:"name" json:"name"`
	Age  int    `param:"age" query:"age" form:"age" xml:"age" json:"age"`
}
httpz.Bind,会自动调用httpz.BindPathParams, httpz.BindQueryParams, httpz.BindBody进行解析
// mux.Post("/user", createUser)
func createUser(w http.ResponseWriter, r *http.Request) error {
	var u User
	if err := httpz.Bind(r, &u); err != nil {
		return err
	}

	return json.NewEncoder(w).Encode(u)
}
5.分组
使用 mux.Group函数进行分组。
func main() {
	mux := httpz.NewServeMux()

	v1 := mux.Group("/v1/")
	v1.Get("/user", func(w http.ResponseWriter, r *http.Request) error {
		w.Write([]byte("from /v1/user"))
		return nil
	})

	v2 := mux.Group("/v2/")
	v2.Get("/user", func(w http.ResponseWriter, r *http.Request) error {
		w.Write([]byte("from /v2/user"))
		return nil
	})

	log.Fatal(http.ListenAndServe(":8080", mux))
}请注意,/v1/后面的/是必须的,这是http.Handle的语法,表示把以/v1开头的的请求都转发到v1处理。
6.中间件
httpz有两种中间件,handlerMiddleware和routeMiddleware
HandlerMiddleware
函数签名为:
type MiddlewareFunc func(next http.Handler) http.Handlerchi的中间件就是就是这样的签名,我们直接使用日志中间件Logger:
package main

import (
	"log"
	"net/http"

	"github.com/aeilang/httpz"
	"github.com/aeilang/httpz/middleware"
)

func main() {
	mux := httpz.NewServeMux()
	mux.Use(middleware.Logger)

	v1 := mux.Group("/v1/")
	v1.Get("/user", func(w http.ResponseWriter, r *http.Request) error {
		w.Write([]byte("from /v1/user"))
		return nil
	})

	v2 := mux.Group("/v2/")
	v2.Get("/user", func(w http.ResponseWriter, r *http.Request) error {
		w.Write([]byte("from /v2/user"))
		return nil
	})

	log.Fatal(http.ListenAndServe(":8080", mux))
}
现在就有打印日志的功能了。
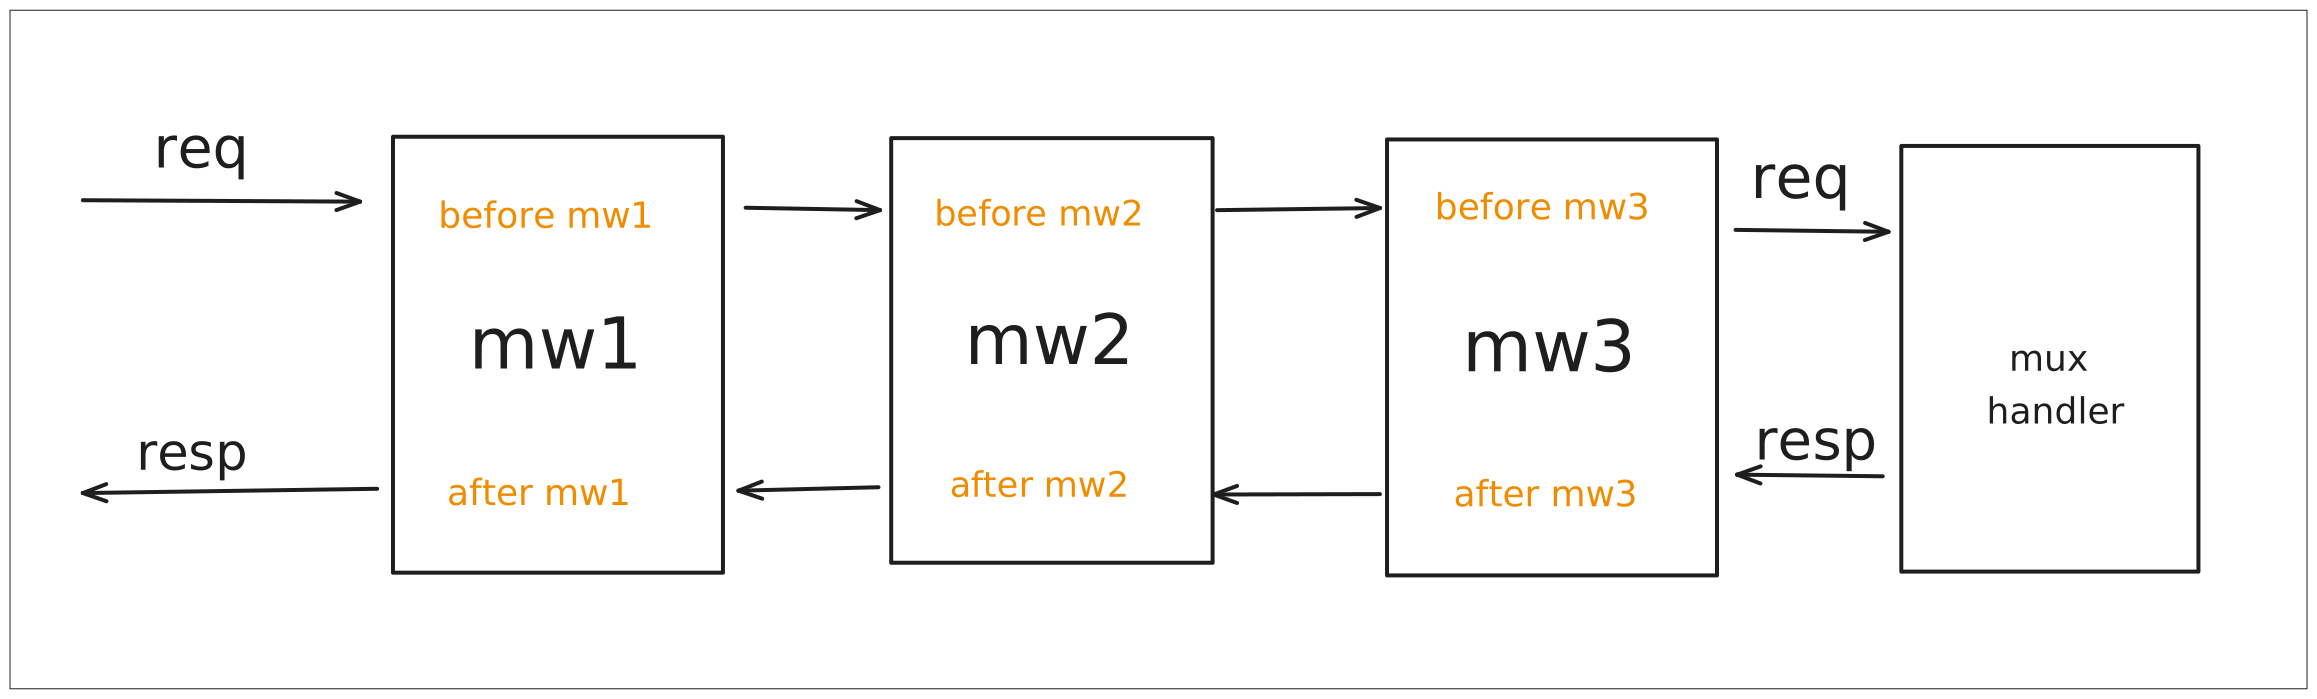
中间件使用了装饰器模式。
定义三个中间件:
func mw1(next http.Handler) http.Handler {
	fn := func(w http.ResponseWriter, r *http.Request) {
		log.Println("before mw1")
		next.ServeHTTP(w, r)
		log.Println("after mw1")
	}

	return http.HandlerFunc(fn)
}

func mw2(next http.Handler) http.Handler {
	fn := func(w http.ResponseWriter, r *http.Request) {
		log.Println("before mw2")
		next.ServeHTTP(w, r)
		log.Println("after mw2")
	}

	return http.HandlerFunc(fn)
}

func mw3(next http.Handler) http.Handler {
	fn := func(w http.ResponseWriter, r *http.Request) {
		log.Println("before mw3")
		next.ServeHTTP(w, r)
		log.Println("after mw3")
	}

	return http.HandlerFunc(fn)
}
它们分别给handler的前后打印信息。
可以在mux.Use()函数中传入多个中间件。
func main() {
	mux := httpz.NewServeMux()
	mux.Use(mw1, mw2, mw3)

	mux.Get("/hello", func(w http.ResponseWriter, r *http.Request) error {
		w.Write([]byte("hello world"))
		return nil
	})
	log.Fatal(http.ListenAndServe(":8080", mux))
}访问http://localhost:8080/hello
你将会看到hello world。
返回命令行,打印了如下日志:
2025/01/15 02:49:17 before mw1
2025/01/15 02:49:17 before mw2
2025/01/15 02:49:17 before mw3
2025/01/15 02:49:17 after mw3
2025/01/15 02:49:17 after mw2
2025/01/15 02:49:17 after mw1
访问路径如下图:
RouteMiddleware
函数签名为:
type HandlerFunc func(w http.ResponseWriter, r *http.Request) error
type RouteMiddlewareFunc func(next HandlerFunc) HandlerFunc
我们可以为每个路由添加中间件,例如
定义一个RouteMiddleware
func routeMW(next httpz.HandlerFunc) httpz.HandlerFunc {
	return func(w http.ResponseWriter, r *http.Request) error {
		log.Println("before routeMW")
		err := next(w, r)
		log.Println("after routeMW")
		return err
	}
}
你可以在路由后面添加任意多个路由中间件:
func main() {
	mux := httpz.NewServeMux()
	mux.Get("/hello", helloHandler, routeMW)
	log.Fatal(http.ListenAndServe(":8080", mux))
}

func helloHandler(w http.ResponseWriter, r *http.Request) error {
	w.Write([]byte("hello world"))
	return nil
}访问http://localhost:8080/hello
你将会看到hello world。
返回命令行,打印了如下日志:
2025/01/15 03:15:22 before routeMW
2025/01/15 03:15:22 after routeMW
原理和HandlerMiddleware一样。
7.响应
你可以使用httpz.NewHelperRW 快捷地返回响应。
// mux.Get("/user", getUser)
func getUser(w http.ResponseWriter, r *http.Request) error {
	u := User{
		Name: "lihua",
		Age:  18,
	}

	hw := httpz.NewHelperRW(w)
	return hw.JSON(http.StatusOK, u)
}或者使用httpz.JSON。它等价于httpz.NewHelperRW(w).JSON。
// mux.Get("/user", getUser)
func getUser(w http.ResponseWriter, r *http.Request) error {
	u := User{
		Name: "lihua",
		Age:  18,
	}

	return httpz.JSON(w, http.StatusOK, u)
}
上面代码等价于
// mux.Get("/user", getUser)
func getUser(w http.ResponseWriter, r *http.Request) error {
	u := User{
		Name: "lihua",
		Age:  18,
	}

	w.Header().Set("Content-Type", "application/json")
	w.WriteHeader(http.StatusOK)
	return json.NewEncoder(w).Encode(u)
}除了JSON方法,还有更多便捷方法
hw.JSON()
hw.String()
hw.XML()
hw.HTML()